Homelab Adventures. Part I
Preface
So, I've recently received my wonderful Minisforum MS-01 Mini PC. And while it is quite miniature in size, it compensates with quite a bit of power and connectivity under the hood.
I'm planning on using it to build a Homelab. Here's some ideas I'm toying with:
- VM Host. Proxmox is taking the lead here as a light-weight VM+Container host.
- NAS. I'm going to attach a USB-powered DAS enclosure, and run TrueNAS in a VM. I can forward the drives directly to the TrueNAS machine and get the best performance
- VPN Server. Currently I'm running Wireguard on my windows machine to be able to access my network securely, but it's quite temperamental and does not deal with reboots well.
- Attach the fiber directly, bypassing provider's hardware. This box is equipped with 2 SPF+ cages, but that could be quite tricky to pull off... If I manage I can do all my firewalling etc right on the box using
pfsenseoropenwrt, which would be pretty sweet.
I've already accomplished two items on that list, namely Proxmox and Wireguard, so here's a brief writeup on what happened.
Proxmox Installation
A few attempts were made, but the suggestion here is – do not use Ventoy for USB Booting. Because of how Proxmox image is structured it can't be booted with Proxmox and needs to be flashed to the USB stick directly. I might have to tweak some secureboot settings after, but for now it is disabled.
Following a suggestion from this Youtube video, I've placed the 2TB drive in the first slot, as it is a PCI Gen4 x4 M2 Slot and it is the fastest. This drive will be used for VM drives. Also, I've placed a smaller, slower 500GB drive into the third slot, and this drive will be used for the host itself. Proxmox boots from it, and it can also hold ISOs and CT templates.
You have to configure a single network port as the management interface and assign a static IP to it. After that all interaction with Proxmox happens via the Web UI.
It tells you that you're lacking a license, but it still works file, you just have to disable the enterprise repos and enable the free (allegedly less stable) repos. Maybe I'll fork out €100/Year for the enterprise support, but so far I'm only playing around and the hardware costs are already stacking up.
Wireguard Installation
To get wireguard going you'll need to get a bit closer to the command line. Firstly, we need a machine. Because this is a light-weight instance that only really supposed to route some traffic, I'll be using an LXC container instead of running a full isolated VM.
Getting the CT Template
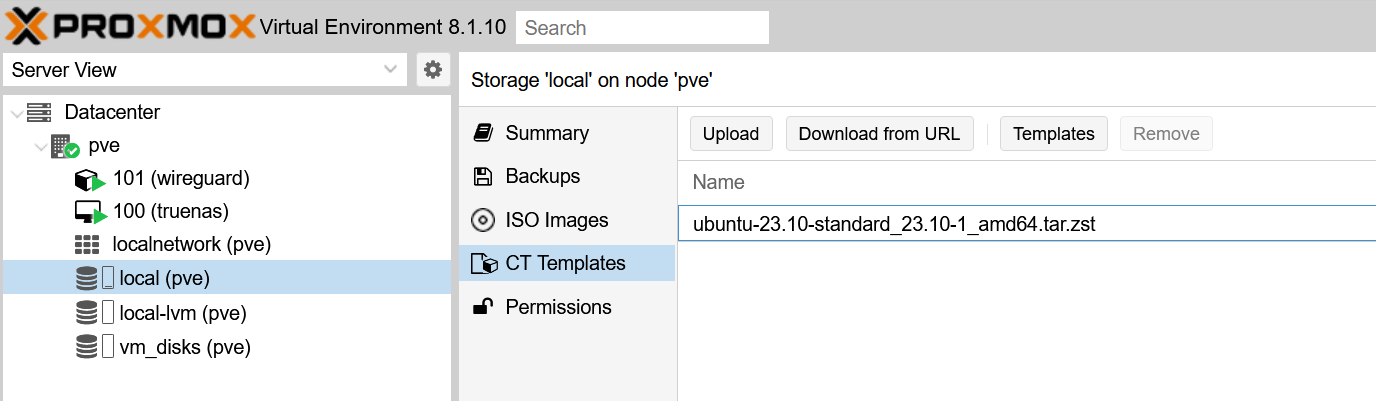 Click on the
 Templates button, find the latest LTS Ubuntu and download it.
Once that's done we can provision the new container.
Creating the Container
I've created my container using following settings:
arch: amd64
cores: 2
features: nesting=1
hostname: wireguard
memory: 512
net0: name=eth0,bridge=vmbr0,firewall=1,hwaddr=xx:xx:xx:xx:xx:xx,ip=dhcp,ip6=dhcp,type=veth
ostype: ubuntu
rootfs: vm_disks:vm-101-disk-0,size=1G
swap: 512
unprivileged: 1
So far I'm still at the mercy of my local router for internal and external connectivity, so I've added a DHCP reservation for the MAC address to be able to port forward correctly.
Make sure to supply a password if you want to use a built-in shell, you can also furnish it with an SSH key.
Configuring Wireguard
We need to get the right packages on the box, so:
apt update && apt upgrade
Then we need to install wireguard package
apt install wireguard-tools
This gives you access to the wg and wg-quick commands, and also the wg-quick systemd services.
Let's create our wireguard configuration. Since I've already had a provisioned config on another machine, I simply ended up copying it. You can get the idea on how to generate keys on the wireguard official site.
You want to create a file under /etc/wireguard/wg0.conf with the following content:
[Interface]
Listen = 10.0.0.1/32 # This is the adapter IP address, it's on a separate network. My regular network runs on 192.168
Port = 12345 # This UDP port needs to be exposed on the router
PrivateKey = ...

[Peer]
...
Once that file is in place we can run systemctl enable wg-quick@wg0 followed by systemctl start wg-quick@wg0 to bring our wireguard interface up. But as it is set up currently traffic can only flow between the peer and the server, no internet access for you yet.
Configuring routing and netfilter
Create a file under /etc/sysctl.d/20-wireguard.conf and add the following lines there:
net.ipv4.ip_forward=1
net.ipv6.conf.all.forwarding=1
Apply it by running sysctl -p /etc/sysctl.d/20-wireguard.conf.
This allows for IP packets to be forwarded between the eth0 and wg0 interfaces, but in order to actually do that we need another piece of the puzzle – netfilter
Netfilter or nftables is a new and improved iteration on iptables. I've not had a chance to use this before, so it's a first for me, but here's how my configuration ended up working.
We need to modify the /etc/nftables.conf file and add the following to the end:
table ip nat {
        chain postrouting {
                type nat hook postrouting priority 100; policy accept;
                ip saddr 10.0.0.1/24 oifname wg0
                masquerade
        }
}
(Updated Apr 23rd. used to say oif wg0, but that breaks on boot if the interface is not ready).
This creates a nat table with a postrouting chain, and in this chain all traffic from our wg0 interface will be masqueraded, meaning the system will automatically handle translating addresses back and forth. All the terminology is similar to how iptables does it but it's a bit cleaner in the configuration.
Either run systemctl start nftables or reboot, as I'm not sure at which point this file gets read...
Conclusion
With all these things in place your Wireguard should now be able to let you access your network and access the internet when you are away from home. I might've missed some steps, because I just finished configuring it and I'm writing from memory, but figuring it out is where the fun lies with the homelab setups.
Good luck!