Vasili's Blog

homelab

Part 1. The beginning

So, I've been running my homelab for a while now, running several services on it, some of which are exposed to the outside. I'd like to be able to access my media collection and photo library and things like that.

In order to make it happen, one could go with a bunch of various HomeLab Homepage software, but I'm quite hands on, so I decided to use Traefik.

Traefik is a proxy server in it's basic form, and unlike nginx it has a bunch of nifty features, such as dynamic runtime configuration, automatic certificate provisioning, built-in metric, etc. It does sacrifice the ability to do other things, though. Not sure if you can proxy directly to unix sockets, for instance. Or run php. But as I wasn't having fun with certbot and nginx on my “production” machine, automatically dealing with certificates was a really nice thing to have.

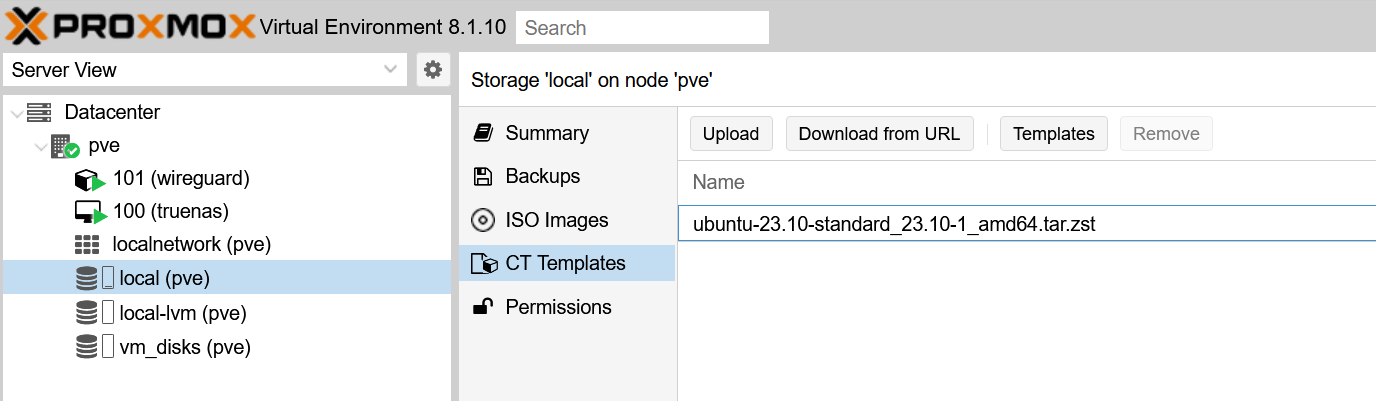
I've created an lxc container in my ProxMox instance, rolled out Alpine on it, and downloaded the traefik binary. After poking a bit with the documentation, I was able to create a directory with config files (I guess my nostalgia for nginx's /etc/nginx/sites-available/ is ingrained too deeply). Once I put some yaml files into that directory the server would automatically pick them up and reconfigure itself without having to do any restarts... Awesome.

Part 2. Keeping up to date

Some time after starting with my ProxMox journey, I've discovered the excellent VE Helper Scripts. It's a collection of small scripts that help you automatically provision various pieces of software (traefik being one of them). I've used it so far to provision Home Assistant for managing my smart home, iVentoy for iPXE booting, n8n and NodeRed for playing with various automation pipelines. It makes a quick work of these things and also allows you to update the main software for that VM or Container.

But the traefik container I've installed manually, so any time I wanted to do an update, I'd have to ssh into it, download new traefik binary, and do that whole song and dance, so I thought, why don't I migrate to a new container, provisioned with a helper script, so that I can keep it updated much easier.

Part 3. The new container

I got the container provisioned, but now I started feeling like manual configuration in yaml files is suboptimal. I'm getting quite lazy with age, and having some kind of UI for some tasks certainly has its draws. I began looking and stumbled upon Mantrae, which provides a UI for configuring Traefik.

You see, Traefik can dynamically read its configuration from a URL. And Mantrae outputs a traefik-compatible JSON file. It can also connect to traefik's API to get a bunch of information from the existing instance.

I deployed it and started configuring the new instance. (All the traffic was still routed to the old traefik instance).

To create the configuration you can use the following command:

systemctl edit --force --full mantrae.service

and put in the following config

[Unit]
After=network.target
Description=Traefik Configuration Daemon

[Service]
EnvironmentFile=-/opt/mantrae/.env
Type=simple
ExecStart=/opt/mantrae/current/mantrae

[Install]
WantedBy=network.target

In my case I keep my software that I install from binaries under /opt/software-name/v1.2.3 and then I symlink /opt/software-name/current to a most recent version. This way I can extract the tarball into the corresponding version, adjust the symlink and try it out. I can easily roll back to the previous version as well.

Make sure to generate secrets as the docs suggest and put them into the .env file. I've also changed my admin username and password. You can find all the env vars in the documentation.

Part 4. Configuration

After downloading a binary and creating a quick systemd launch configuration I was able to get to the Web UI.

creating a profile

This points to the traefik instance, and once it's created you should be able to see the stats traefik server status

Now we can create a Router... creating a router ... and add a service adding a service

I couldn't get Mantrae to automatically detect my certificate resolver, but you can look it up in your traefik.yaml, in my case it was predictably Let's Encrypt

certificatesResolvers:
  letsencrypt:

So just type letsencrypt in the “Resolver” field.

Part 5. Wiring up traefik and switchover

In order for traefik to use it, we have to add it to the main config. Originally I tried to put it into the dynamic folder, but that didn't work at all, so just put it into the main config, probably /etc/traefik/traefik.yaml

providers:
  file:
    directory: /etc/traefik/conf.d/
    watch: true
  http:
    endpoint: http://localhost:3000/api/Default

In my case they both run on the same container, and the capitalization matters in the url.

After restarting traefik I was able to see the http provider in the dashboard

http provider

I've configured all my existing services, basically mirroring my original traefik instance via Mantrae, so that all of them were set up through it's UI. After comparing the two dashboards, to make sure everything is the same, there was one step left. I wanted to re-use my certificates that were already provisioned, so a quick

scp old-traefik:/opt/traefik/acme.json /etc/traefik/ssl/acme.json

and the cert storage was moved over.

Then I simply went to my router, and pointed it to the IP address of the new container, and that was done...

My Uptime Kuma has recorded a small blip of an outage, as my router was restarting, but that quickly got resolved.

I'll write about setting that up in another post

#homelab #traefik #mantrae #uptimekuma

So, after lamenting about price of MoCA adapters, I decided to take a look on FB Marketplace, and someone was selling a pair of MoCA 2.5 for $120, which is quite a better deal compared to what Amazon was offering.

This morning we met up and I grabbed them, and also got by my local hardware store to get some coax cables and couplers.

After hooking everything up I went from this: Before

to this: After

A marked improvement. My NIC is only rated to 1Gbps, so I can't really test beyond those speeds, even though my fiber plan is currently at 1.5Gbps. Should've done this ages ago...

#homelab #networking #moca #fiber

This time it's not quite related to the homelab setup itself, but my home networking.

Original Setup

We live in an older townhouse, which was never wired for any kind of ethernet, so it's all WiFi for us, and WiFi is quite crappy usually. Very high speed variation, packet loss, latency, neighbours microwaving knocks out your multiplayer game... You know the drill.

The way the current set up is wired is pretty precarious too.

We have a fiber line coming in the basement, and you don't want to put your wifi router in the basement of a 3-story townhouse. But this is new system by Telus, where the router is essentially hard-wired and does not have a WiFi, but instead you have another unit which does WiFi. And you can connect it to the Fiber router either via MoCA (over antenna coax) or over 10Gbps ethernet.

When ours was installed, we probed some antenna cables and found one that terminates in the living room on the second floor, and the TV happens to reside there, so we thought – it's as central of a location for a wifi router as we can have, that also kinda fits aesthetically. My wife wouldn't want to have just some random-ass router just standing on the floor in the middle of the house, just because the antenna cable happens to terminate there.

My office however is on the third floor on the opposite end of the building, relative to the router. I'm not directly above it.

flowchart LR

    subgraph Second Floor
        WiFi
        WiFi --Ethernet--> Homelab
    end

    subgraph Basement
        Fiber --> Router
        Router --> PowerlineA
    end

    Router -.MoCa.-> WiFi

    PowerlineA -.Mains.-> PowerlineB

    subgraph Third Floor
        PowerlineB
        Laptop
        PC
        PowerlineB --Ethernet--> Laptop
        PowerlineB --Ethernet--> PC
    end

    WiFi --> Phones

Issues with this setup

It was like I described above, and I would suffer horrible packet loss that made zoom calls basically impossible. You'd get disconnected, robot voices, all the good stuff... I even installed a program to continuously ping my router so I can be warned when it started to crap out. This was no way to live and work, but we are still somewhat far from a renovation big enough to open up walls and floors to lay CAT6 cable and build networking closets...

I've looked at MoCA adapters, but for some reason they are really expensive. Like $200-$300 for a pair. Then I looked into alternatives and found the TPLink Powerline adapter (TL-PA9020P), which was available from a local computer shop, open box for $100, which was quite a bargain.

I bought it, brought it home, and hooked it up. One unit went in the basement on the same wall socket the router was connected to, and the second went all the way up to my office. Both units have 2 ethernet ports and I believe they use hubs internally (more on that later). They were linked up, all the lights were glowing red and the traffic was flowing.

I was getting about 100Mbps over powerline and about 70Mbps over wifi, with no packet loss and no crazy latency spikes. So it was a win.

Where I am now

I've been using this set-up for months, without really thinking about it. But getting the mini-pc and starting to migrate some services from my main PC that is in my office, I though, am I getting the best speeds here? Why do I only see 100Mbps. Apparently that number was quite a red herring. I started googling, and some people suggested that my ethernet cable on either end is to blame, since it tops out at 100Base-T. So today I've unpacked some CAT6 cables rated for 10000Base-T and plugged them in.

No change. I started scratching my head... If I plugged in the laptop directly into the router or the MoCA Wifi Box I'd get ~800Mbps. If I was line of sight to the router over WiFi I would get ~600-700Mbps. So clearly the powerline thing does not deliver. It is rated for a gigabit.

The hunt for the perfect wall socket

Okay, let's see, does moving one of the adapters change the situation? I unplug it and go to the guest room on the same floor... Suddenly I'm only reading 75Mbps. I go one floor down – 150Mbps. Finding a socket in the basement gets me as high as 200Mbps.

Eventually I even tried having both adapters on the same cable run, which should be as close to ideal conditions as you can get. 300Mbps and no more...

I'm not sure what kind of environment one must have to get it to a Gigabit. Maybe over 10cm 99.9% pure copper gold plated cables or something, running on a pure sine from a generator.

Another problem is that every floor is connected over a separate main cable. They all terminate at the breaker. Even if I try to have one adapter on the first floor hooked up to the MoCA Wifi Box the signal has to go to the basement, through the breaker, through the main bar, and out another breaker to the run that goes to the third floor. Ironically the basement socket is the best possible placement for one of these adapters, as that has the shortest run to the breaker box.

Conclusion

I guess my power lines are way too noisy, and that makes powerline only 10% efficient. Now that I do record and edit youtube videos it would be nice to get those 800Mbps upload speeds that our symmetrical fiber provides. So maybe I should revisit the MoCA adapter idea. Time is money after all.

#homelab #networking #powerline #10000baseT

Preface

So, I've recently received my wonderful Minisforum MS-01 Mini PC. And while it is quite miniature in size, it compensates with quite a bit of power and connectivity under the hood.

I'm planning on using it to build a Homelab. Here's some ideas I'm toying with:

  • VM Host. Proxmox is taking the lead here as a light-weight VM+Container host.
  • NAS. I'm going to attach a USB-powered DAS enclosure, and run TrueNAS in a VM. I can forward the drives directly to the TrueNAS machine and get the best performance
  • VPN Server. Currently I'm running Wireguard on my windows machine to be able to access my network securely, but it's quite temperamental and does not deal with reboots well.
  • Attach the fiber directly, bypassing provider's hardware. This box is equipped with 2 SPF+ cages, but that could be quite tricky to pull off... If I manage I can do all my firewalling etc right on the box using pfsense or openwrt, which would be pretty sweet.

I've already accomplished two items on that list, namely Proxmox and Wireguard, so here's a brief writeup on what happened.

Proxmox Installation

A few attempts were made, but the suggestion here is – do not use Ventoy for USB Booting. Because of how Proxmox image is structured it can't be booted with Proxmox and needs to be flashed to the USB stick directly. I might have to tweak some secureboot settings after, but for now it is disabled.

Following a suggestion from this Youtube video, I've placed the 2TB drive in the first slot, as it is a PCI Gen4 x4 M2 Slot and it is the fastest. This drive will be used for VM drives. Also, I've placed a smaller, slower 500GB drive into the third slot, and this drive will be used for the host itself. Proxmox boots from it, and it can also hold ISOs and CT templates.

You have to configure a single network port as the management interface and assign a static IP to it. After that all interaction with Proxmox happens via the Web UI.

It tells you that you're lacking a license, but it still works file, you just have to disable the enterprise repos and enable the free (allegedly less stable) repos. Maybe I'll fork out €100/Year for the enterprise support, but so far I'm only playing around and the hardware costs are already stacking up.

Wireguard Installation

To get wireguard going you'll need to get a bit closer to the command line. Firstly, we need a machine. Because this is a light-weight instance that only really supposed to route some traffic, I'll be using an LXC container instead of running a full isolated VM.

Getting the CT Template

CT Download ScreenClick on the Templates button, find the latest LTS Ubuntu and download it. Once that's done we can provision the new container.

Creating the Container

I've created my container using following settings:

arch: amd64
cores: 2
features: nesting=1
hostname: wireguard
memory: 512
net0: name=eth0,bridge=vmbr0,firewall=1,hwaddr=xx:xx:xx:xx:xx:xx,ip=dhcp,ip6=dhcp,type=veth
ostype: ubuntu
rootfs: vm_disks:vm-101-disk-0,size=1G
swap: 512
unprivileged: 1

So far I'm still at the mercy of my local router for internal and external connectivity, so I've added a DHCP reservation for the MAC address to be able to port forward correctly.

Make sure to supply a password if you want to use a built-in shell, you can also furnish it with an SSH key.

Configuring Wireguard

We need to get the right packages on the box, so: apt update && apt upgrade Then we need to install wireguard package apt install wireguard-tools This gives you access to the wg and wg-quick commands, and also the wg-quick systemd services. Let's create our wireguard configuration. Since I've already had a provisioned config on another machine, I simply ended up copying it. You can get the idea on how to generate keys on the wireguard official site. You want to create a file under /etc/wireguard/wg0.conf with the following content:

[Interface]
Listen = 10.0.0.1/32 # This is the adapter IP address, it's on a separate network. My regular network runs on 192.168
Port = 12345 # This UDP port needs to be exposed on the router
PrivateKey = ...

[Peer]
...

Once that file is in place we can run systemctl enable wg-quick@wg0 followed by systemctl start wg-quick@wg0 to bring our wireguard interface up. But as it is set up currently traffic can only flow between the peer and the server, no internet access for you yet.

Configuring routing and netfilter

Create a file under /etc/sysctl.d/20-wireguard.conf and add the following lines there:

net.ipv4.ip_forward=1
net.ipv6.conf.all.forwarding=1

Apply it by running sysctl -p /etc/sysctl.d/20-wireguard.conf. This allows for IP packets to be forwarded between the eth0 and wg0 interfaces, but in order to actually do that we need another piece of the puzzle – netfilter

Netfilter or nftables is a new and improved iteration on iptables. I've not had a chance to use this before, so it's a first for me, but here's how my configuration ended up working.

We need to modify the /etc/nftables.conf file and add the following to the end:

table ip nat {
        chain postrouting {
                type nat hook postrouting priority 100; policy accept;
                ip saddr 10.0.0.1/24 oifname wg0
                masquerade
        }
}

(Updated Apr 23rd. used to say oif wg0, but that breaks on boot if the interface is not ready).

This creates a nat table with a postrouting chain, and in this chain all traffic from our wg0 interface will be masqueraded, meaning the system will automatically handle translating addresses back and forth. All the terminology is similar to how iptables does it but it's a bit cleaner in the configuration.

Either run systemctl start nftables or reboot, as I'm not sure at which point this file gets read...

Conclusion

With all these things in place your Wireguard should now be able to let you access your network and access the internet when you are away from home. I might've missed some steps, because I just finished configuring it and I'm writing from memory, but figuring it out is where the fun lies with the homelab setups.

Good luck!

#homelab #proxmox #wireguard